Tarkov | EFT Interchange Map Guide
Prepare to dive into the heart of Tarkov’s retail battleground with our concise Tarkov Interchange Map Guide. We’ll reveal key locations, loot hotspots, and extraction points to help you navigate this sprawling maze of commerce and conflict. Get ready to conquer Interchange armed with the knowledge you need to survive and thrive in this perilous environment with our Tarkov Interchange Map Guide.

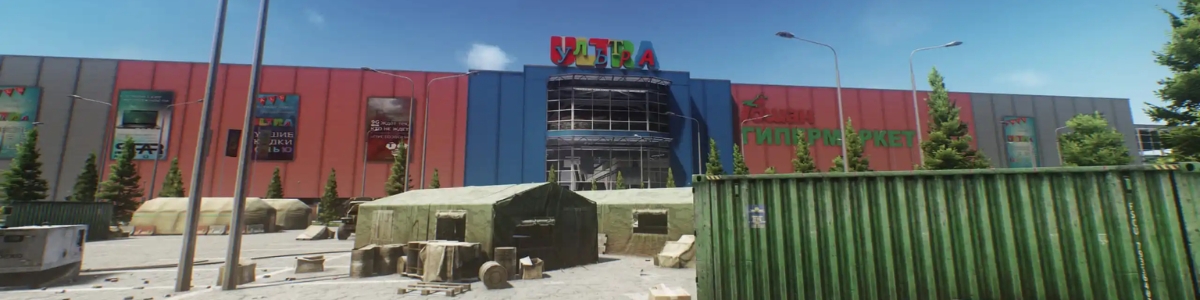
Tarkov Interchange Map Guide
Interchange is a challenging map with typically 16 players, although this number may vary. It’s known for its intense firefights and strategic gameplay. Getting into the mall itself can feel like a battle, and once you’re inside, be prepared for ambushes around every corner and extract campers lurking nearby. But fear not, we’re here with our Tarkov Interchange Map Guide to lead you through the best strategies to survive and thrive.
When it comes to spawning, you can find yourself anywhere along the perimeter of the map. Whether it’s along the front, back, or sides, be ready to adapt to your surroundings right from the get-go. Now, let’s delve deeper into the heart of Interchange.
Railway Extract
We’re currently positioned on the front side of the mall, near the railway extract point. The railway extract is just over there. For key storage, we highly recommend using a Docs Case for this map as it conveniently holds all the keys you’ll need. While there are some register keys, we’ve left them behind as their purpose is quite straightforward – opening cash registers. When crossing the road, exercise caution and ensure you’re not silhouetted against the skyline. It’s wise to glance behind you occasionally to spot any approaching players.
Navigating this area can be challenging as many players are here for specific quests. Given these objectives, expect intense encounters and heightened competition, especially with those farming for kills. As for the exterior of the mall, scavengers can spawn in the front section across from us.
Mall Layout
When discussing the front of the mall, it’s helpful to break it down into sections. On the front side, you’ll find IDEA, the middle third houses Goshan, and the opposite side is occupied by OLI. To grasp the layout of the map, visualize a center line running through the middle of the mall. Understanding which side of this line you’re on provides clarity about your location within the mall.
Navigating the levels of the mall can be simplified by referring to them as the basement or underground level, the ground floor or first floor, and the top floor.
Pharmacy Key/Room
At the entrance to IDEA, you’ll find the pharmacy key and a chance for LEDX spawns, although they’re quite rare. Be sure to check the shelves for plenty of meds to loot, making it a worthwhile stop for stocking up on supplies. Let’s continue our Tarkov Interchange Map Guide.
IDEA Area
In the IDEA section, you’ll encounter numerous Scavs near the front registers and throughout this area. Many players rush to this spot, which is also tied to a quest requiring an item from the nearby table. Additionally, there’s a good chance of finding valuable items like graphics cards and tetrises on the shelves behind the computers. Although there used to be common spawns for Lions in this area, it’s not as frequent anymore. However, keep an eye out for shelves resembling the ones shown here, as they can still yield valuable items. In the past, collecting large quantities of cats was a common practice among players, with some amassing hundreds before a wipe reset everything.
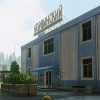
Power Station
Alright, now we’re heading to the power station. Some areas of the map require the power to be on for access, so it’s best to do this early on. The power station also has a decent chance of spawning Scavs, which can be helpful if you need to complete tasks like “Make Ultra Great Again” that involve killing a lot of Scavs.
Power Station V-Extract
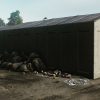
Here’s the car extract, and if the car is spawned, you’ll see a black SUV. This area tends to attract attention as players rush here for both combat and loot. Inside the building, you’ll find computers, filing cabinets, and several jackets, along with duffel bags and toolboxes. Keep an eye out for a rare LEDX spawn.
Outside, toolboxes are common in the buildings, and there’s a hidden stash beyond the blue fence. After covering IDEA and the power station, we’ll move on to Goshan.
No-Backpack Loot Runs
For newcomers in Tarkov looking to earn some money, doing a no-backpack run can be quite effective. Prioritize getting the largest rig possible. Depending on whether you spawn on the railway side or the Emercom side, you can loot the rear areas of Idea. These areas often contain a plethora of technical items, such as corrugated hoses, which fetch a high price early in the wipe. Keep an eye out for duffel bags and toolboxes spawning in various locations, including shelves and back areas. While offline mode loot doesn’t always mirror online mode, it’s still worth thoroughly checking spots like these for valuable tech items.
Hole In Fence (No-Backpack) Extract
If you’re aiming for a quick and profitable run on Interchange, consider looting the back shelves without a backpack. This strategy can yield significant returns, especially early in the wipe. There are two main routes to reach the no-backpack extract. One option is to head down this path, vault over the barrier, and the extract is right around that corner. However, be cautious of potential campers behind the Swan tank, as they often target players rushing to the extract. Another route is to navigate through the basement by following this path. Along the shelves in the basement, you’ll find plenty of barter and tech items to loot.
It’s also worth exploring the far end, especially if you’re low on gear or running as a Scav. Many players overlook these spawns, making it a relatively safe area to loot. You’ll find several weapon crates in close proximity, offering the chance to snag extra guns. While players heading to Emercom may pass by, the back area tends to be less frequented, making it an attractive option for scavengers or those looking to top up their loot before extraction.
Goshan Area
In Goshan you’ll find a spawn point for car batteries. They can be found along this wall, extending across and along the adjacent wall. Keep an eye out, as sometimes they’re nestled between the shelves. Additionally, spark plugs can spawn in this area.
Throughout Goshan, there are food spawns on the shelves. It’s essential to check them every time you pass by. Look out for valuable items like gold chains and Bitcoins, which occasionally appear amidst the food items. While Chainlets are less valuable, they’re also worth grabbing.
On the opposite side, you’ll find more food spawns on these shelves and the back wall. Sometimes, they even hide inside the containers. If you’re on a quest for specific food items like Tushonka, this area is your best bet.
Moving on from Goshan, there’s a computer room nearby, where you’ll find approximately six computers on average.
Mall Center Area
The next location of our Tarkov Interchange Map Guide is Mall Center Area. We’re currently standing at the heart of the mall. To simplify, imagine the center line running from IDEA on one side to Goshan at the back. If you’re feeling disoriented, just remember: IDEA is on the left side if you’re facing the front, which is the railway side. Conversely, Goshan is on the right side, or the IDEA side, from the front view.
It’s crucial to pay attention to your spawn point, especially if you’re in this corner of the map. One spawn provides access to the Emercom extract, while the other offers the railway extract. They’re very close, so double-check your spawn to avoid confusion.
In this area, known as German, there are plenty of tech spawns. You’ll find valuable items like graphics cards, circuit boards, and earpieces. Additionally, there’s a jacket and some weapon crates tucked away in the back.
Emercom Key/Room
Next up is Emercom. Inside, you’ll find potential LEDX spawns. While we don’t have the exact spawn locations, anywhere you see medical items, there’s a chance for LEDX. Make sure to check all the shelves. It’s a good spot to restock on meds like morphine and saline. Previously, there used to be an LEDX spawn on this shelf, but things might have changed. Remember, each door you unlock using the key consumes one use, so be mindful of how many doors you open to conserve your key uses.
If you’re in need of motors and drills, these shelves are worth checking out. Some of the side rooms are becoming increasingly lucrative. For example, just on the other side of that wall, there are decent spawns for technical items and barter items. Mantis is another noteworthy room with med spawns, med bags, and quest items. If you’re completing “Vitamins Part 1,” you’ll need to visit both Mantis and Emercom.
Brutal primarily offers tech spawns, while national houses four filing cabinets. Some players Scav in specifically to loot these cabinets, though it’s not as common on this map. You might hear them rummaging around, especially near the power station, where there’s another filing cabinet spawn. This should give you a good sense of what to expect in each store.
Kiba Key/Room
You’ll need two keys to access it. Depending on someone listing their Quest key on the flea market, you might be able to buy both. When you open it, an alarm triggers. Look out for a Gen 4 Assault or Mobility armor that can spawn on one of the mannequins. Guns also spawn on the wall, including AK 103 or 104 with thermal, M4s, AKs, MP5s, and more. Additionally, check the cabinets for loose spawns. If you hear the alarm, someone’s opened ARMS. There’s a way to turn off the alarm, and the glass is usually bulletproof, but it can vary from wipe to wipe.
Moving on to the left, we have Generic. It has many military spawns, like med crates. In the back, you might find gold chains and possibly rollers. Inside, you’ll find a weapon cabinet, a jacket, and several weapon crates. Listen for the distinct wood noise to confirm someone’s in Generics.
Second Floor Tech Stores
When you’re upstairs and hear the distinct wood noise below, you’ll know someone’s in Generics. Inside, you’ll find various electrical spawns, including graphics cards, tetrises, and helixes. Moving to techno, you’ll find more electrical tech spawns in this area as well.
OLI Area
In the central area, you’ll find shelves spawning items like WD-40s, corrugated hoses, and motors. Along the back, there are cages that can spawn car batteries, as well as computer terminals for looting. These cages, like the one here, host car battery spawns, along with computers on alternate shelves. Emphasizing computer spawns is crucial because of the current high value of graphics cards, fetching around 800,000 rubles. Therefore, it’s worth searching every computer for potential graphics card finds.
OLI Keys
This is the OLI Logistics key, essential for a specific quest. Inside, you’ll find the quest item, along with another computer. Additionally, there’s another room accessible through the back doorway, likely requiring an OLI Admin or OLI Utility key, featuring more computers and a weapon crate.
Third Floor Tech Store
On the third floor in Techlight, you’ll find numerous electrical spawns, including computer parts, G phones, graphics cards, and gas analyzers, all of which are essential items, especially in the early stages of the game.
Ultra Medical Key/Room
On this side, we have Ultra Medicals, which was once considered one of the most coveted keys in the game. The key is required to access both the med spawns on the outside and those on the inside. With the power turned on, you can open the door. Inside, you’ll typically find LEDX on the sides, along with defibs and ophthalmoscopes, although the latter is not as common as it used to be.
Killa (Boss) Overview
Let’s talk about the scav boss on this map, known as Killa. He lives up to his name, as he’s incredibly deadly. Killa sports a helmet with exceptionally high armor value, and his body armor is no joke either. Additionally, he’s equipped with a weapon that’s like a laser beam, capable of hitting targets across the map. If you hear him, your first instinct should be to seek cover.
In my experience, the best way to take him down is to lead him to a door, shut it behind you, and wait for him to approach. Then, unleash your firepower as he reaches the door. However, even with this tactic, Killa remains a formidable opponent. There’s always a chance he might catch you off guard, despite your preparations.
Now, let’s explore this room here, which tends to be overlooked. You’ll find medical spawns scattered throughout the shelves. Remember, where there’s a medical spawn, there’s a chance for a LEDX to appear. So, while it’s not guaranteed, it’s worth keeping an eye out for this valuable loot. Additionally, don’t forget to check the table and the computer for any potential meds or other useful items. It’s always good to know where to find supplies, especially when you’re running low.
11SR Keyswipe Location
At this point of our Tarkov Interchange Map Guide, we’re essentially above the entry to Goshan, situated on the top floor. If you possess the 11SR key, think of SR as “survival room” or “safe room”. Swipe your key on the designated spot, often found near the toilet, and you’ll unlock the extract known as the Safe Room. Once activated, we’ll head towards the extract. However, it’s worth noting that if the alarms are blaring in the Ultra Medical area, you can silence the top floor alarms by interacting with the switch here.
To swiftly reach the Safe Room, follow these steps: descend the escalator, take a left turn, proceed through the hole in the ground, and then turn left again. For those interested in staying updated on the best keys for the map.
As for this room, it’s packed with computers, totaling around six or seven spawns. You’ll typically find them stacked in triplets, with additional spawns scattered around the room. Be thorough in your search, as valuable items may be hidden among the terminals.
How to Disable the Alarm?
To deactivate the alarm for the ground floor, simply toggle the switch. Once clicked, you won’t hear the key alarm ringing anymore. Additionally, there’s a back entrance to the top floor accessible via this staircase and another identical one at the opposite end. This staircase leads to the computer room we previously mentioned on the other side of Goshan. It’s a discreet passage to the top floor, perfect for executing surprise flanks.
If you find yourself under fire on the ground level and need to outmaneuver your opponents, sprint across the map to one of these staircases. Ascend to the top floor swiftly and catch your adversaries off guard with a well-timed flank. Squads often move slowly and are easily identifiable due to their frequent movement, making them vulnerable to surprise attacks from the side. Utilize this strategy to gain the upper hand and secure victory.
Safe Room Extract
As we descend here, we’ll veer left to reach the safe room, passing by Generics on our left and Raz on our right. The basement layout follows a simple straight line across the front, with a couple of passages leading towards the back. One path goes towards the power station, while the other heads towards Emercom.
Approaching the safe room, exercise caution as it could be occupied by campers. If the door is open and you’re a Scav, avoid entering and flicking the switch inside. Doing so locks you in and prevents extraction, potentially leading to your demise.
Inside the safe room, you’ll find valuable loot opportunities. Gold spawns can be found in one area, along with weapon crates and parts. Additionally, shelves may hold moonshine, whiskey, and other valuable items.
There’s a lever in the room labeled “Object 14.” Pulling this lever opens up another area near the power station, filled with additional loot opportunities. While this area can be lucrative, it may not always be worth the risk, especially when already safe in the extract.
To initiate extraction, double-click the lever on the door. However, be mindful of the fluctuating price of the key, typically ranging from 300,000 to 500,000 rubles. Despite the cost, investing in the key can provide a relatively safe extraction point, potentially yielding valuable loot to offset the expense.
Lastly, be wary of the dangers around OLI and the Emercom extract, as both areas can be fraught with scavengers and extract campers. Avoiding these risky situations can help ensure a smoother and safer experience in the future.
OLI Computer Rooms
Inside this area, you’ll find a computer room with multiple doors leading to additional loot opportunities. Approximately ten computers can be found here, offering the chance to uncover valuable items.
Remember the passage at the rear of Goshan, where we discovered several weapon crates? That passage is located right here, adjacent to the computer room.
Be cautious near the back of Emercom, as it’s a popular spot for potential campers. Additionally, watch out for individuals who may utilize the elevated areas to snipe unsuspecting players. Exercise vigilance, especially if attempting tasks like Shooter Born in Heaven, as adversaries may take advantage of these vantage points. Lastly, the Emercom extract is situated towards the rear, providing a potential escape route from the area.
Emercom Extract
Here’s the Emercom extract, right in front of us. This extraction point is notorious for campers who lurk in various spots. They may hide atop the tents, in bushes, or even lie prone in the back of trucks, waiting to ambush unsuspecting players. It’s a challenging area to navigate due to the constant threat of ambushes.
For tasks like Shooter Born in Heaven and similar challenges, it’s essential to exercise caution as snipers may target you from elevated positions. Additionally, campers may lie in wait near the extract, ready to strike when you’re vulnerable. This is why having alternatives like the car extract or utilizing other options is advisable, rather than solely relying on Emercom.
Keep an eye out for valuable loot along the back wall, where you can find items for barter trades and technical supplies. Car batteries often spawn in specific locations, such as these four spots here. Don’t forget to check the shelves for motors, corrugated hoses, and other useful items.
Scav Camp Co-op Extract
The Co-op extract, often called the Scav camp extract, offers a unique opportunity for both PMC and Scav players. There’s even an achievement tied to using this extract, so it’s worth seeking out. Located at the very front of the mall where several crashed cars are clustered together, this extract provides a chance for PMCs to gain Fence reputation and receive an item from Fence.
To utilize this extract as a PMC, you’ll need to find a scav to cooperate with. Once you’re at the designated area, you can initiate the extraction process. Typically, players communicate by firing a specific shot pattern, akin to the Terminator movie, to signal their intent to extract. If the area turns green, it indicates that someone is present and ready to use the Co-op extract.
It’s important to note that the Co-op extract turns green only for this specific purpose and doesn’t apply to other extracts like the safe room, which activates upon powering up.
21WS Keyswipe Location
The 21WS key, while not particularly expensive, can be a valuable asset if you enjoy scavenging around the outskirts of the map. With the power turned on, this key grants access to a shipping container located on the front left side of the mall, near the Emercom wall.
Inside the container, you’ll find various loot items. With an average yield ranging between 100,000 and 200,000 rubles per opening. The loot can include Trooper armors, complete firearms, and valuable weapon parts.
If you’re already exploring the outskirts of the map and spot the powered-up container during nighttime raids, it’s definitely worth taking a detour to open it. The potential rewards make it a lucrative opportunity for those who prefer to avoid the main mall area. Additionally, this section covers the Emercom extract and insights into Interchange gameplay.
In conclusion, mastering the Interchange map in Escape from Tarkov opens up a world of opportunities for loot, quests, and intense PvP encounters. By following our Tarkov Interchange Map Guide, you’ve gained valuable insights into key locations, extraction points, and strategies to survive and thrive in this diverse and challenging environment. So gear up, explore with confidence, and may your raids be filled with success. Thanks for reading our Tarkov Interchange Map Guide. Good luck, and happy hunting!